Showing posts with label Sew. Show all posts

Sunday, August 26, 2012

Quilting and Math - OH MY!

When I first thought about quilting I was a small child.  I don't even know if I understood math at that time, and I know I didn't realize how math and quilting would go together.

As an adult I am thrilled to use some of those math skills that I so laboriously learned in school!  Today's lesson is in geometry and HEXAGONS!!! 

Lets go back to the beginning of quilt philosophy.  I believe that the outcome of a quilt is directly linked to the beginning of the quilt.  I've found that if I take my time and make sure my pattern is exact, my cutting is exact (or as exact as I can make it) and I double check things before I assemble them - I usually have a much better outcome.  Not only does the quilt look better, but my temper and patience aren't nearly as taxed.

When I started working with hexagons (6-sided figures, each side equal in length with 60 degree angles) I bought premade paper patterns.  This solved the problem of making sure the patterns were perfect, but it did three things that I didn't like:
  1. It COST MONEY!!! (I hate spending money if I can do it myself)
  2. It made me dependent on someone else - if I ran out of patterns at 11:00 on a Sunday evening (yes, sometimes I quilt late at night) how would I handle it?  What if my LQS (Local Quilt Store) was out of those patterns? 
  3. I was not able to customize the size for what I wanted.  I love to use pictures and ideas as inspiration for my quilts.  I don't always follow directions - I make up my own as I go (yes this can cause problems, but once you do this enough you'll usually be able to dig yourself out of those problems)
So let me explain how these patterns are used.  There is an old pattern called, "Grandmother's Flower Garden" today this is known as "English Paper Piecing".  In days gone by, women cut hexagons out of whatever paper they had, many times it was a newspaper or an old Sears's catalog.  She would use scraps of cloth from whatever and eventually, when she had enough pieces she would assemble a quilt top.  She would usually put a solid in the center and printed material around the edges to form a "flower".  Here are some samples of pictures I found on the web:

I can tell you there are at least 1,000+ different ways to use these little hexagons!

You need to make paper hexagons for each of these pieces of fabric.  The fabric is actual sewn to the paper, then the hexagons are sewn together and lastly the paper is pulled out.  So can you imagine how many of these you'd need to do a simple project?  Yep - a bunch.  So lets learn how to make the hexagons.

Step 1 - Figure out how big you want the hexagon.  You'll see them referred to as say a 1.5" hexagon, 2" hexagon etc.  this refers to the length of each side (all 6 sides of the hexagon are the same length).  I don't pay much attention to these references.  I rough draw the size I want for the project I want to make.  For instance, when I did an all white on white dresser runner I used hexagons that were about 1.5" and when I made hexagons for my table topper I used a size about 3.5".  The beauty of doing this yourself is YOU can control the size!!

Step 2 - Gather the materials you'll need.
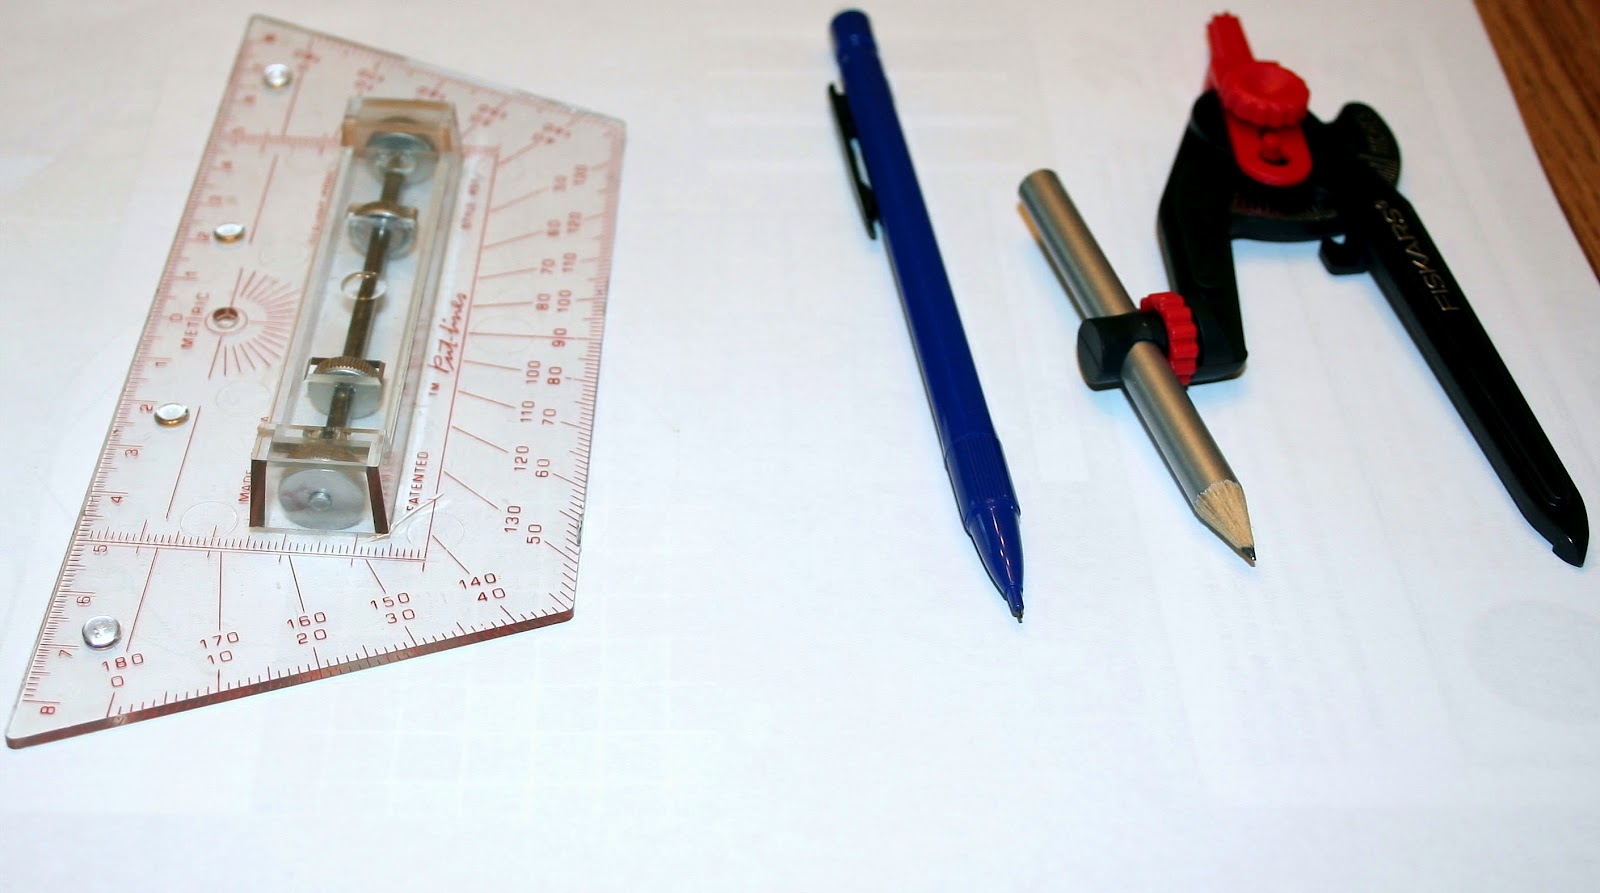
You'll need:
  1. Ruler
  2. SHARP Pencil
  3. Compass
  4. Paper
  5. Maybe a magazine or something thick so that the point of the compass doesn't scratch your table top
Step 3 - Draw your rough sized hexagon, then calibrate the compass to draw a circle the same size as the hexagon you've rough drawn.  I also make a dot where the center of my circle is located coinciding with the point of the compass. DO NOT CHANGE THE COMPASS SETTINGS, LOCK THEM IN WHEN YOUR CIRCLE IS THE CORRECT SIZE!

Step 4 - Draw a line through the center of the circle, through the dot that you drew in step 3

Step 5 - Using your compass (with the EXACT same settings as you used to draw the circle) put the point of the compass on the point where the line bisects the circle then draw a small mark with the pencil of the compass to bisect the circle on the left and on the right


Step 6 - Repeat step 5 for the other end of the center line and when you're done the drawing should look like this.

Note you have SIX marks on the circle, the two you created in step 4 with the line, the 2 you drew in step 5, and the 2 you drew in step 6.

Step 7 - Connect the dots!  Use your ruler to draw a line between each of the marks on the circle - you will draw SIX lines.


When you're done with step seven the drawing should look like this

Step 8 - Now cut out your master hexagon
Step 9 - I call this my DOUBLE CHECK step.  I cut out 5 or six patterns out of paper and then put them together to make SURE that the hexagons are correct.  If you did everything above, took your time and made sure you were precise it should look like this.

That is all there is to it!  You've made your hexagons.

What's around the corner?  I will create a new page on the blog for instructions on how to make a project using your newly made hexagons.

Sunday, August 5, 2012

Baby Quilt

I made this quilt for a friend of mine whom I work with and his wife.  They were going to have a boy!  Since I've only had granddaughters and daughters, FINALLY I would get a chance to make a boy's quilt!

I asked my friend what theme did they have?  He told me none.  I asked what colors, to which he replied, nothing specific but no pastels. 

Well that left the door wide open!  So I drafted a quilt pattern, calculated my yardage and off to the LQS I went (Local Quilt Store).  I fell in love with Moda's Meadow Friends.  This is the quilt.

Baby Quilt - Moda's Meadow Friends
I quilted it on my Bernina and just did some simple echo quilting to simulate ripples in water.  Imagine a stone being dropped in the pond - the ripples flowing outward. 
Close up of quilt
I know you can't see it very well - the picture didn't do the quilt justice (plus the fact the quilt was photographed upside down). 

I tend to make baby quilts larger than what would be considered "normal".  I remember as a young mother always wishing the baby blankets were just a smidge larger. 

The batting is dream cotton and I quilted it with YLI thread.  Once I washed it I thought it looked nice.  Not too puffy, but just enough to give it some definition.

Saturday, August 4, 2012

Reset on My Quilt Studio

UGH it was a huge task!
When we moved to VA one of our agreements was I could have the small guest room as my studio.  We moved in and I sort of just jammed things in the room willy nilly.  That was 5 years ago.  It was very disorgnaized and it was becoming increasingly difficult for me to use the room, and honestly I didn't want to be in the studio.

So I decided to rip the studio apart. The only thing I left in the room (besides the walls, doors,celing and floor) was the cutting table.

I use a wire cube rack system to help me organize my things.  Because I have so many crafts I need extreme organization or it is unusable.  My biggest craft, by far, is quilting.
Wire rack system set up

You'll see my flag showing 2 members of my family serving in the US military.  I'll blog on that later in a separate post.

The white boxes to the left of the wire racks, are actually drawers (and they end up elsewhere in the final room).  You can also see a wooden book case tucked in on the left side.  That is going to be replaced with a taller bookcase at a later date.  When that comes in I'll blog about it because I am going to be refinishing it myself!

So here is a corner of my room after I had it all organized.
Pretty colors, bright light through the window and my beloved Bernina sewing machine.  Beneath the window is a bench with pretty wicker baskets under it (they are stuffed with projects).  Laying on the bench are the parts and pieces for what would become the gold quilt (it has it's own blog)
And this is the wire cube wall unit assembled and filled

All of my quilting fabrics neatly wrapped and displayed in color families.
At the top is a teddy bear (you can see him sitting on top of a brown cube).  He is one of my hand drafted, hand sewn teddy bears.  I used to make these and sell them, but now I'm just making them for my grandkids. 

So much fabric!  I've been collecting for almost 20 years.  I've traded and bartered.  Some of the fabrics are left overs from commissioned quilts and some are gifts.  I don't subscribe to the old quilting adage, "She who dies with the most fabric wins" but I do enjoy having lots of choices.

You can buy the wire cubes at Target and if you're interested in the fabric storage boards I used to organize things, just drop me a note and I'll give you the contact information.

Friday, August 3, 2012

Steps of Quilting

Quilting is my way of expressing myself.  I try to design or chose patterns that match the person I'm making the quilt for taking into account the use of the quilt etc.  I love it when I work with someone (like a granddaughter) and manage to draw out the information I need to create a quilt that they will love and USE!

In my opinon, there are a few distinct stages to quilting:
  1. Getting to know what the receipient wants! This is usually where I begin.  Sometimes the person has no clue, and other times they are definite about their wants. For instance, Grandaughter #2, who is 6 year old told me, "I want it pretty, I want lots of white and B-R-I-G-H-T colors"  Okay I can work with that (I will be posting this quilt in a series of blogs which should begin sometime this fall).
  2. Or step 3 depending - Pattern choice. This is usually my second step as it will set the tone for the fabric I chose.  If you look at my blog "RED QUILT" you'll see an example of a quilt that was made with this step being #3 - yet it still turned out looking great! 
  3. Or step 2 depending - Fabric choice.  This is usually my third step and I base it on the pattern choice.  As I say this, I can say that probably 1/4 of the quilts I've made were this as step 2 with the pattern following.  But I find it is usually easier to do pattern and then fabric.
  4. Piecing the top.  This is where the parts are cut and then sewen together.  I machine piece.  Some people will hand piece their tops, and that is a personal choice.  Personally I love to machine piece as it allows some speed in the process but I also think the seams are more sturdy.
  5. Quilting the top.  This is the second to the last step.  If the quilt is small or the seams are straight (see RED QUILT) I will do this on my Bernina.  If I want a pattern to the quilting or if the quilt is large, I will finish it on a LAQ (Long Arm Quilter).  Lucky for me, there is a machine at my LQS (Local Quilt Store) where I've taken lessons and can rent time on their machine.
  6. Finishing the quilt.  I like to hand sew the binding on the edge.  If I have a quilt label I attach it during the binding process.
So that is a quick list of the steps to making a quilt.  There is more indepth discussions and other considerations, but I'll save that for another blog posting.

Gold Quilt

I love quilting.  I consider myself an advanced beginner.

Quilting is a way to express myself.  I love traditional fabrics and tradtional patterns. 
Here is an example of what I enjoy (for myself) - this was made for our big guest room. 
Double Irish Chain with Moda's Morris Tapestry fabrics.  The pattern for the quilt is from the Quilt in Day Irish Chain book, the pillowcases and shams were my own design, influenced by the pattern for the quilt.
It was my first bed skirt too!  It was difficult to figure it out, but I managed.  I made the decking out of an old duvet cover that was past it's prime (as no one would see it).  I will caution you though the corners at the foot of the bed were a pain.  Each side has an inset (you can't see it well in this picture). 

I will post instructions for the bed skirt in another blog later.

Red Quilt

This quilt was made for my best friend's wedding.  She LOVED the fabric and really LOVED the red!  I didn't follow any published pattern, I drafted and created this myself. 
M's Quilt!  The pattern is based on an old pattern called a Braid.  I call this a modified braid.  I created the patterns for the quilt and pillow shams myself.  The material is by Moda and it is the Luna Note pattern.

I quilted this myself on my Bernina 440 QE.  I definitely built strong arm muscles!  Oh it was difficult!  The finished size was 120 x 98!  She wanted it to have a long drape (distance from the edge of the mattress to the edge of the quilt) Here is what the back looks like.

Back of M's Wedding Quilt


If I had it to do all over, I'd have quilted this on a LAQ (Long Arm Quilting Machine).  The good news is my friend loves it and it makes me happy to see it on her bed, proudly displayed and lovingly used every day.

So that launches me into one of my personal opinions on quiting.  I make most quilts to be USED!  One of the greatest moments in my life as a quilter came from Granddaughter #1.  I had been quilting for many years and then took about a 10 year break.  The first quilt I did, after my long break, was her quilt.  It wasn't perfect but it was hers and she had picked out the fabrics and helped me set the rules for the quilt (for instance each of the focus fabrics could only be on the quilt once and each of the complimentary fabrics could only appear twice etc).  It was about 4 years later that she and her Mom called me to explain that the quilt had a small tear in it and could I fix it?  It was an easy "band aid" fix (thank goodness) but as I was fixing it I saw a small stain and another small wear spot.  I fixed the wear spot and was getting ready to cover up the stain - when it hit me.  Why?  That was the quilt's badge of love.  She was USING the quilt!!!  I will admit to you that I had tears in my eyes.  I live about 250 miles away from her and I never actually saw her use the quilt, but here was the proof that it was used and loved.