Hello everyone!
I've been away for a while! I started a new job and it took up a great deal of my bandwidth. But I'm back to blogging now!
CC
Sunday, October 28, 2012
Layer Cakes into Pinwheels
I recently posted a picture of the quilt I made for our first Grandson.
I promised to post the instructions to assemble this easy quilt. Before I get started I will confess that I am NOT a photographer! You'll need to excuse my pictures - they will get the point across and give you a decent pictorial lesson, but the pictures are not great! That said.....
First of all you'll need to either purchase a "layer cake" (which is a pre-cut bundle found at most quilt stores) or cut 40 squares of fabric 10"x10". I like layer cakes because you get a great variety of fabrics and they all go together without you having to match up different pieces of material etc.
The first thing I do is lay out the layer cake in two groups like this
 The criteria for the two groups - patterns in one pile and solids (or almost solids) in the other.
Once you get these stacked up you need to make up 20 "pairs". The pairs will form the pinwheels. here is an example of a completed pinwheel:


Once you have your pairs set up you will be pinning a pair together like this:
 Making sure to line up and match all the sides and corners! This is VERY important.
An aside: In my quilting experiences I've said to myself "oh don't worry about that not lining up perfectly it won't matter, I mean how much can 1/8th of an inch matter in a 90x70 quilt?" Trust me, save yourself aggravation - IT MATTERS!!!!
Now sew all four edges with 1/4" seams.
Then take your squares to the ironing board and STARCH THEM. I starch them VERY VERY heavily. when I'm done the fabric is almost board stiff. WHY? In the next step you are going to cut them into TRIANGLES!!! Triangles have bias and bias means STRETCH (a dreaded word to a quilter). By starching the living daylights out of your squares, the triangles will not stretch as much.
 After you starch them to death you need to cut them into triangles. I am assuming everyone knows how to use a rotary cutter, ruler and mat. If not, email me and I'll help you. So make your first cut corner to corner like this:
 Now turn and cut the triangles in half so that you now have:
 Okay now the fun part! Press your triangles open.
An aside: PRESS does not mean IRON! Iron means to move the hot iron back and forth over the material. PRESS means to press down with the hot iron, lift it and press down again. If you iron your triangles it may cause them to stretch out of shape. PRESS!!!!
Another aside: Before I press anything I always "set the seam". This means PRESSING the seam line BEFORE opening the seams to press them open.
When you are done it should look like this:
 NOTE that the red ones on the left show the backside, the green ones on the right are the front.
Lets look a bit closer at the squares, if you do you'll see each corner has a rabbit ear like this (the black arrow points to this):
You should clip these ears on all four corners so that your corners are smooth. All trimmed up they should look like this:
 I'm one to save just about every scrap I make however I can easily throw these little tips out!
Lay out the squares. I'll lay mine out like this:
From here on out the sky's the limit here is one idea (besides pinwheels)


GOOD LUCK on your pinwheel quilt!
The quilt for my grandson took me an afternoon to piece. This project moves along quickly and it is impressive when you're done. I add borders (cut strips to 3.5" wide, makes a 3" border) and then finish as you wish. My grandson's quilt was quilted in the ditch and then hand bound.
If you make one of these quilts, please send me a picture so I can post it!
What's around the next bend? I have taken a break from quilting and sewing too for the past 2 months! I think my next project might be a hand bag - if so I'll post pics and instructions!
 |
| Grandson's Quilt |
First of all you'll need to either purchase a "layer cake" (which is a pre-cut bundle found at most quilt stores) or cut 40 squares of fabric 10"x10". I like layer cakes because you get a great variety of fabrics and they all go together without you having to match up different pieces of material etc.
The first thing I do is lay out the layer cake in two groups like this

Once you get these stacked up you need to make up 20 "pairs". The pairs will form the pinwheels. here is an example of a completed pinwheel:

Make the two that you pair "match". I try to take one fabric from the print pile and one from the solid/almost solid pile. I should caution you to match up all 20 pairs, you may have to adjust the pairs to make it work out.


An aside: In my quilting experiences I've said to myself "oh don't worry about that not lining up perfectly it won't matter, I mean how much can 1/8th of an inch matter in a 90x70 quilt?" Trust me, save yourself aggravation - IT MATTERS!!!!
Now sew all four edges with 1/4" seams.
Then take your squares to the ironing board and STARCH THEM. I starch them VERY VERY heavily. when I'm done the fabric is almost board stiff. WHY? In the next step you are going to cut them into TRIANGLES!!! Triangles have bias and bias means STRETCH (a dreaded word to a quilter). By starching the living daylights out of your squares, the triangles will not stretch as much.


An aside: PRESS does not mean IRON! Iron means to move the hot iron back and forth over the material. PRESS means to press down with the hot iron, lift it and press down again. If you iron your triangles it may cause them to stretch out of shape. PRESS!!!!
Another aside: Before I press anything I always "set the seam". This means PRESSING the seam line BEFORE opening the seams to press them open.
When you are done it should look like this:

Lets look a bit closer at the squares, if you do you'll see each corner has a rabbit ear like this (the black arrow points to this):
 |
| The color on this one is horrible but it shows the rabbits ear the best. |

Lay out the squares. I'll lay mine out like this:
 |
| NOTE THE MISTAKE in the red one. I didn't realize this until I looked at them laid out for this picture! this is the reason I lay out these squares. Plus I can begin designing |

If you want to "stretch" the fabric you have to make a larger quilt, you could alternate pinwheels with solid fabric. I laid out a piece of fabric and then laid the blocks on it to show you what it might look like:

The sky is the limit. I've seen people who toss all of the the triangles in a bag and draw them out randomly and assemble them. In my opinion this would work really well if you were using scraps instead of a layer cake. Your choice.
Assembling the pinwheels.
I can't stress enough to line up seams and things here.
Lay out the pin wheel

Now flip the left square on top of the right one and pin it.

Before you sew the 1/4 inch seam make sure the two seams match up like this:

Sew your seam and then PRESS the block open.

I line it up again to make sure I'm still setting the blocks up correctly.
Now flip the top to the bottom pinning and making sure the seams line up.

Sew the 1/4 inch seam and then PRESS the block open.
You should take the time to square up the finished block. The center is where taking the time to line up the seams really pays off. This is what the center of the finished block should look like:

GOOD LUCK on your pinwheel quilt!
The quilt for my grandson took me an afternoon to piece. This project moves along quickly and it is impressive when you're done. I add borders (cut strips to 3.5" wide, makes a 3" border) and then finish as you wish. My grandson's quilt was quilted in the ditch and then hand bound.
If you make one of these quilts, please send me a picture so I can post it!
What's around the next bend? I have taken a break from quilting and sewing too for the past 2 months! I think my next project might be a hand bag - if so I'll post pics and instructions!
Thursday, September 6, 2012
Military Esprit de Corps
For those of you who don't know this yet, I am a proud military family member. My father retired from the US Navy, my husband retired after 29 years in the Army, my son-in-law is in the Army, my daughter and her husband are in the Air Force and I have numerous brothers, brother-in-laws, nephews etc. that have all (or are) serving.
My whole life has had the military running through it. I work for the US Army as a contractor. So you get the theme here.
One thing I LOVE about our troops is their ability to keep their humor up and the incredible esprit de corps that they display when things are rough. To that end, several different groups of military folks have done parodies of the song, "Call me Maybe" by Carly Rae Jepsen. I've begun to collect these parodies as I love watching them and seeing the troops smiling.
I wanted to share three of my favorite ones with you.
The first one I'm going to link to a story first, you can watch the video from there. I suggest you read the story first as it will put the video into a much sharper focus for you when you learn of the back story.
http://www.ericraum.com/home/2012/7/5/call-me-maybe-military-style.html
And the second one is here:
http://www.youtube.com/watch?v=8EjLbVmXIqg&feature=player_embedded
And the last one is here. A note on this one - these soldiers are from the 101st Airborne Division (Air Assault) they work with helicopters. Most of the movements they make in the video are real movements that are used to direct helicopters in battle. I was perplexed by the moves with their belts and the counting until my husband explained they were gearing up with carabiners to repel out of the helicopters - okay now it made sense. As you watch this one make sure you take note of the soldiers off to the left they are cracking up too.
http://www.youtube.com/watch?v=C8NrgjnoKIA
I hope you enjoy these versions and please remember that each of these military people are serving our country in a war zone so that we and others can have freedom. God Bless them all!
UPDATE to Our Garden Visitor(s)
The past few days have been very hectic! Sorry I've not posted more. I thought I'd show you a bit more of our yard and discuss some visitors.
 This is the front door all decked out for summer. I change the wreath every month or so. I love to make wreaths! This one though had a problem. A little bird kept trying to build her nest here. I cleaned up 4 or 5 eggs that broke before she moved her home to...
 this tree which is in the front yard. Can't see the nest?
 Not the best picture, but you can get the idea.
We love our birds, and I will post more on them as time goes on. However I wanted to share an update to an earlier blog, "Seen-In-my-Garden". It was in this post that you met a visitor to my garden who has stayed all summer. We've left him alone and he has done nothing but GROW!
He has almost doubled in 3 weeks. We measured him and he is over 3 inches from tip of leg to tip of leg - as you see him here (We didn't, nor could we, flatten his legs out).
It is kind of scary and neat all at once. He has a following in our neighborhood as several of the kids come to see him every day.
I will admit I am NOT a fan of spiders (or crawly things in general) but this spider has won a spot in our life. He is so taciturn, sitting there and catching bugs ignoring the humans who gaze at him. He reminds me of a grumpy old man who harrumphs when people speak to him!
A final view for this morning are my flower pots. I have 4 - two in front of the house at the bottom of the steps and two on the porch by the door. I mix up what I do every year - no two years are the same except for the center spiky plants - Dracina!
 I really loved the pretty purple and white petunias.
What's around the bend? I have some more pictures of plants that I love - just have to squeeze out the time to post them for you!
May your day be blessed and your time be plentiful. CC


We love our birds, and I will post more on them as time goes on. However I wanted to share an update to an earlier blog, "Seen-In-my-Garden". It was in this post that you met a visitor to my garden who has stayed all summer. We've left him alone and he has done nothing but GROW!
 |
| Top of Spider |
 |
| Bottom of Spider |
He has almost doubled in 3 weeks. We measured him and he is over 3 inches from tip of leg to tip of leg - as you see him here (We didn't, nor could we, flatten his legs out).
It is kind of scary and neat all at once. He has a following in our neighborhood as several of the kids come to see him every day.
I will admit I am NOT a fan of spiders (or crawly things in general) but this spider has won a spot in our life. He is so taciturn, sitting there and catching bugs ignoring the humans who gaze at him. He reminds me of a grumpy old man who harrumphs when people speak to him!
A final view for this morning are my flower pots. I have 4 - two in front of the house at the bottom of the steps and two on the porch by the door. I mix up what I do every year - no two years are the same except for the center spiky plants - Dracina!

What's around the bend? I have some more pictures of plants that I love - just have to squeeze out the time to post them for you!
May your day be blessed and your time be plentiful. CC
Monday, September 3, 2012
Apfelpfannkuchen
Apfelpfannkuchen - WOW what a mouthful! I can translate this to mean "Apple Pancake". Please understand that I don't speak but about 3 words of German. When I translated this, well I could have said, "YUMMY" but... I'm sure that isn't even close!
Before we begin with this recipe let me start by giving you some background and a warning! I grew up most of my life in Ohio. My Mamaw and Papaw were of solid German descent and Mamaw cooked variations of many German dishes that I'm familiar with now. I can remember, as a very small child sitting at the breakfast table after doing our farm chores, the mouthwatering smells of apples cooking. Since Mamaw has gone on to her rewards in heaven, I can't ask her for her recipe. I've spent 30+ years searching for something close to her apple breakfast pancake/cake/bread. I think I was about 5 years old the last time I had this at her house.
Well I've finally found a recipe that is pretty close to what I remember. Apfelpfannkuchen!! I should tell you that I searched books and the web to come up with this recipe which is a combination of several different recipes.
WARNING - this is NOT to be consumed if you are on a diet!!! This is FAR from diet food. That said....
This recipe gives me a sweet apple treat that rises like a souffle, turns a beautiful golden brown in my oven - and when removed from the oven it gently falls and forms an eggy delightful treat. We eat this for breakfast, but it could be served as a desert. The aroma which fills my kitchen is apple cinnamon and YUM!
I have been known to adjust the spices to taste!
1/2 cup AP Flour 4 eggs at room temperature
1 Tbs of sugar 1 cup room temperature milk
1/2 tsp baking powder 1/4 cup + 3 TBS of butter
1/8 tsp salt 1/2 tsp vanilla
1/4 tsp fresh ground nutmeg ground cloves
1/2 cup brown sugar 1/2 tsp cinnamon
1 lg tart apple
Preheat oven to 425 degrees
1 - In a medium bowl combine flour, sugar, baking powder and salt
2 - Then add & combine eggs, milk, 3 TBS melted butter, 1/8 tsp nutmeg and vanilla.
3 - Set the bowl aside for a 1/2 hour on the counter
4 - After the batter is together, peel and core one large apple and then cut it into thin slices
7 - Pour the batter into the pan with the apples
8 - Gently stir the mixture to incorporate all of the ingredients
9 - Now pop this in a 425 degree oven for 15 minutes. Reduce the temperature to 375 degrees and finish the Apfelpfannkuchen for another 10 or so minutes. It is done when you insert a toothpick and it comes out clean.
10 - I invert mine onto a plate, be warned that this will "fall" and sort of flatten out - that is what you want it to do!

11 - I serve mine with warmed maple syrup.
I hope you enjoy this recipe.
I'd like to leave you with one more tip or idea. When I find a new recipe I want to try, I faithfully follow the instructions. After we try the new recipe I find myself often tweaking or adjusting the flavors to suit my family. When I do this, I always leave the original recipe in tact on my recipe card and make notes on the back of the card as to my adjustments. Just an idea!
What's around the bend? I haven't a clue what will be my next food posting. I usually have the inspiration to blog a recipe hit me about 2 minutes into the recipe.
Is there any recipe you'd like to see blogged? If so let me know and I'll see if it is in my abilities and pocketbook!
Before we begin with this recipe let me start by giving you some background and a warning! I grew up most of my life in Ohio. My Mamaw and Papaw were of solid German descent and Mamaw cooked variations of many German dishes that I'm familiar with now. I can remember, as a very small child sitting at the breakfast table after doing our farm chores, the mouthwatering smells of apples cooking. Since Mamaw has gone on to her rewards in heaven, I can't ask her for her recipe. I've spent 30+ years searching for something close to her apple breakfast pancake/cake/bread. I think I was about 5 years old the last time I had this at her house.
Well I've finally found a recipe that is pretty close to what I remember. Apfelpfannkuchen!! I should tell you that I searched books and the web to come up with this recipe which is a combination of several different recipes.
WARNING - this is NOT to be consumed if you are on a diet!!! This is FAR from diet food. That said....
This recipe gives me a sweet apple treat that rises like a souffle, turns a beautiful golden brown in my oven - and when removed from the oven it gently falls and forms an eggy delightful treat. We eat this for breakfast, but it could be served as a desert. The aroma which fills my kitchen is apple cinnamon and YUM!
I have been known to adjust the spices to taste!
1/2 cup AP Flour 4 eggs at room temperature
1 Tbs of sugar 1 cup room temperature milk
1/2 tsp baking powder 1/4 cup + 3 TBS of butter
1/8 tsp salt 1/2 tsp vanilla
1/4 tsp fresh ground nutmeg ground cloves
1/2 cup brown sugar 1/2 tsp cinnamon
1 lg tart apple
Preheat oven to 425 degrees
1 - In a medium bowl combine flour, sugar, baking powder and salt
2 - Then add & combine eggs, milk, 3 TBS melted butter, 1/8 tsp nutmeg and vanilla.
3 - Set the bowl aside for a 1/2 hour on the counter
4 - After the batter is together, peel and core one large apple and then cut it into thin slices
5 - Take a skillet (cast iron works GREAT) that can go from stove top to oven and melt the remaining1/4 cup of butter. When the butter is melted add the brown sugar, cinnamon and the remaining 1/8 tsp of fresh ground nutmeg to the melted butter and stir gently. Then add the thinly sliced apples.
6 - Let this simmer gently on the stove until the mixture is bubbly and the apples have begun to soften
 |
| After step 6 is completed |
 |
| After step 7 is completed |
 |
| After step 8 is completed |
 |
| YUM! Fresh from the oven |

11 - I serve mine with warmed maple syrup.
 |
| What was left after breakfast this morning! |
I'd like to leave you with one more tip or idea. When I find a new recipe I want to try, I faithfully follow the instructions. After we try the new recipe I find myself often tweaking or adjusting the flavors to suit my family. When I do this, I always leave the original recipe in tact on my recipe card and make notes on the back of the card as to my adjustments. Just an idea!
What's around the bend? I haven't a clue what will be my next food posting. I usually have the inspiration to blog a recipe hit me about 2 minutes into the recipe.
Is there any recipe you'd like to see blogged? If so let me know and I'll see if it is in my abilities and pocketbook!
Sunday, September 2, 2012
Airborne and Special Operations Museum/Foundation
You see my whole family has or is serving. My father in the Navy, my husband Army, my daughter and her husband Air Force, and my nephew is Army. I've never put on the uniform of our nation, but I too have served. I have given my most precious commodity - my family to the defense of our nation.
I don't care what your opinion is of the war we are currently participating in, but please remember the men and women who are fighting this war are not to blame. Please remember them in your thoughts and prayers.
Now on to my story!
This summer I was privileged to attend a reunion of my husband's old Brigade, the 35th Signal Brigade (Airborne). We celebrated with his friends, their families and other warriors of the Brigade. The reunion was held at Fort Bragg, Fayetteville, NC. We visited the Airborne and Special Operations Museum.
 |
| The Airborne & Special Operations Museum Front Entry |

If you ever have a chance to go to the museum, it is well worth the time. Entry is free! If you can't get to the museum here is a link to their website: http://www.asomf.org/
While the reunion group was there we dedicated a marker to honor the Brigade.


It was awesome to see the men and women who have served in this Brigade over the years. I was humbled and found that my eyes filled with tears more than I'd like to admit.

Above is the stone set in the walkway. These are all the places the Brigade has served in combat.
So tonight, when you get ready for bed, please remember to include the men and women in uniform who serve night and day to keep us safe.
Monday, August 27, 2012
Grandson's Quilt
Currently my husband and I are the proud grandparents of FOUR grandDAUGHTERS. I've longed for a grandson! I love my granddaughters very much! I have loved making pink quilts and attending tea parties and playing Barbie dolls. However, probably because I had 3 girls myself, I've wondered what it would be like to have a grandson!
Our oldest daughter is due in late October and she is having a boy! She and her husband are so excited! My husband and I are excited! Unfortunately, she lives about 12 hours (driving) from us and we can't get out to see her before the baby is due. So I shipped her 3 things I made for the baby.
The first was a quilt:


 I quilted this with echo quilting - just sewing around each triangle. I used a low loft cotton poly blend batting. The back is a piece of baby flannel that I had. I like to back baby quilts with flannel, I think it makes them softer. I hope she likes this!
My other two handmade gifts were self binding receiving blankets. Here is what they look like:

These are literally the easiest thing I've ever made! I mean E-Z! It takes a 40" square of the print flannel and a 30" square of the solid, about an hour and you're done.
I learned how to make these from Jenny at Missouri Star Quilting's YOUTUBE video lesson - here is a link:
http://www.youtube.com/watch?v=lqwdNqMZ8Ro
I can recommend this pattern to anyone. It is fast, easy and not expensive at all. If I were to do this over again, I'd get some extra flannel and make some matching burp cloths!
Anyway these all went in a UPS box and should arrive at her home tonight! She promised to call me when the box arrives and open them with me on the phone. I can't wait!
What's around the bend? I'm working on another quilt with the same pattern using a layer cake, except this time I'm documenting the steps so I can post it for you to use. Look for a blog sometime in the near future with the instructions.
Our oldest daughter is due in late October and she is having a boy! She and her husband are so excited! My husband and I are excited! Unfortunately, she lives about 12 hours (driving) from us and we can't get out to see her before the baby is due. So I shipped her 3 things I made for the baby.
The first was a quilt:
This quilt was a breeze to make! I had a coupon for 50% off one item at my LQS (Local Quilt Store) so I obtained the fabric "layer cake" for about $20 dollars. The border, binding and backing were all in my stash. I used the MODA line "Ten Little Things" because my daughter loves owls and the fabric had trucks and things on it! I'll do a separate blog on how to use a layer cake to make this quilt.
Here are some closeups of the fabric.


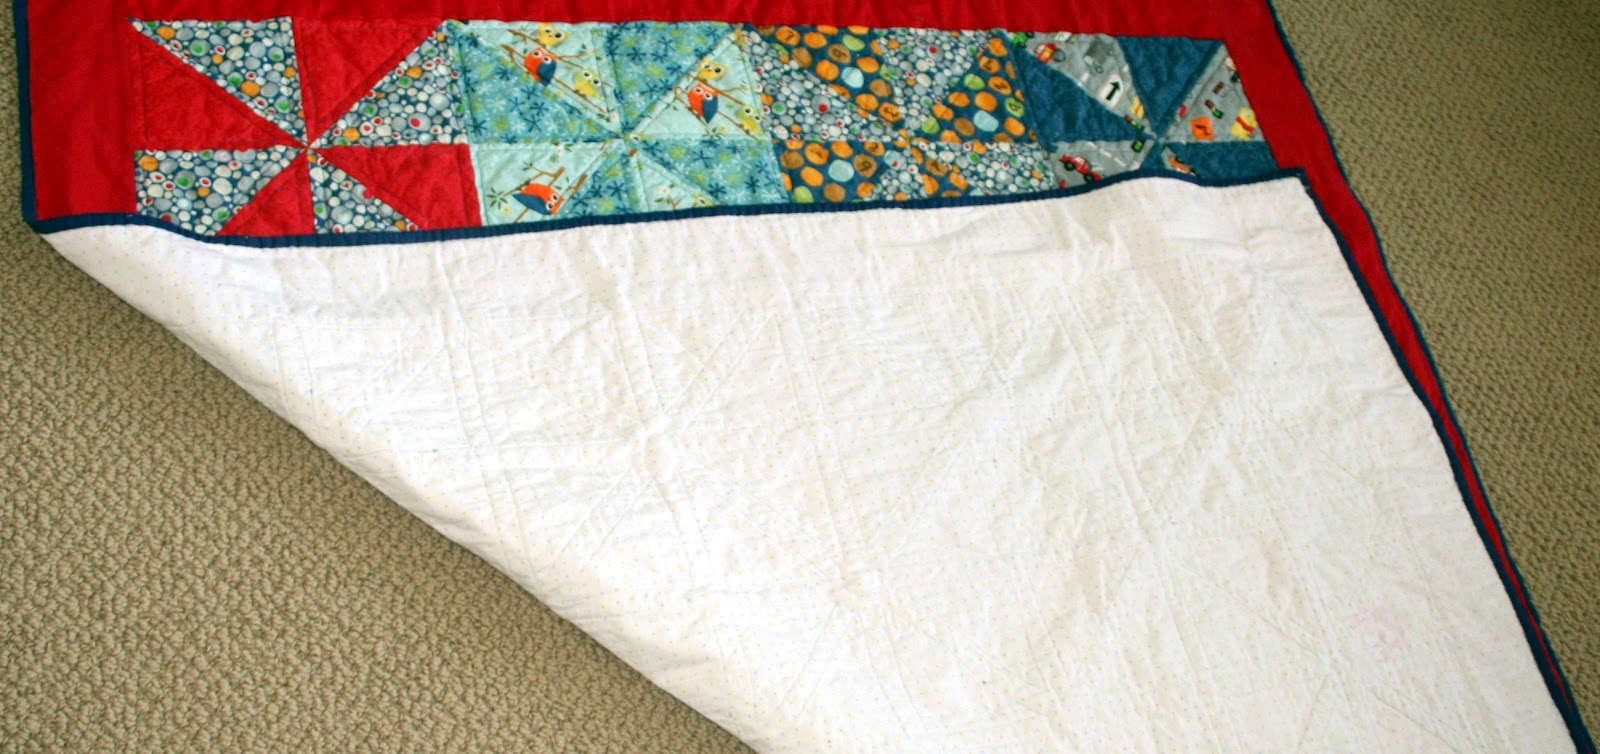
I backed it with some soft flannel and it looked like this:
My other two handmade gifts were self binding receiving blankets. Here is what they look like:
These are literally the easiest thing I've ever made! I mean E-Z! It takes a 40" square of the print flannel and a 30" square of the solid, about an hour and you're done.
I learned how to make these from Jenny at Missouri Star Quilting's YOUTUBE video lesson - here is a link:
http://www.youtube.com/watch?v=lqwdNqMZ8Ro
I can recommend this pattern to anyone. It is fast, easy and not expensive at all. If I were to do this over again, I'd get some extra flannel and make some matching burp cloths!
Anyway these all went in a UPS box and should arrive at her home tonight! She promised to call me when the box arrives and open them with me on the phone. I can't wait!
What's around the bend? I'm working on another quilt with the same pattern using a layer cake, except this time I'm documenting the steps so I can post it for you to use. Look for a blog sometime in the near future with the instructions.
Subscribe to:
Comments (Atom)